Everyone dreads the thought of a failed home inspection. It can delay or even derail your plans to buy or sell a home, plus it adds unanticipated costs and headaches. But does failing an inspection mean disaster? Are there ways to avoid breaking down when it happens? In this post, we’ll separate fact from fiction by exploring the truth about failing a home inspection – so you can be prepared for any outcome!

What is a Home Inspection?

A home inspection is an objective examination of the physical structure and systems of a home, from the roof to the foundation. Inspectors look for visible signs of disrepair and identify any items that are not performing adequately or may have not been installed properly.

While a home inspector’s job is simply to assess the condition of the property, homeowners often mistakenly believe that inspectors are there to pass or fail them. This misconception can lead to a great deal of anxiety during the home inspection process.

So, what exactly happens if your home doesn’t “pass” inspection? In most cases, it simply means that the buyer and seller will need to renegotiate to remedy any issues that were raised. In some instances, however, failing to negotiate over a significant issue can spell the end of a sale altogether.

Fortunately, there are a few things you can do to prepare for your home inspection and increase the chances of “passing” with flying colors. First and foremost, be sure to disclose any known issues with the property upfront. This is critical to protect yourself legally and also prevent any “bad blood” from developing between the buyer and the seller. Anticipate their inspector finding a problem – it’s best to grab the bull by the horns and deal with things head-on. Secondly, take some time to address any minor repairs or cosmetic flaws that could give inspectors cause for concern. By taking these proactive steps, you can help ensure a successful outcome for your home inspection – and ultimately your home sale.

Is There Really Such Thing as Failing a Home Inspection?

When it comes to home inspections, there are a lot of myths and misconceptions out there. One of the most common is that you can “fail” a home inspection. The truth is, there is no such thing as failing a home inspection.

An inspection is simply an opportunity for you to learn more about the condition of the property you’re interested in purchasing. The inspector will look for any major problems that could affect the value or safety of the home. If any are found, they will be listed in a report for you to review.

It’s important to remember that an inspection is not a pass/fail test. The goal is simply to provide you with information so that you can make an informed decision about whether or not to purchase the property.

How to Prepare for a Home Inspection

A home inspection is an important step in the home buying/selling process. It can also be a source of stress for buyers and sellers alike. There are a lot of myths out there about what major issues can pop up on a home inspection report. In this blog post, we’ll separate fact from fiction when it comes to failing a home inspection.

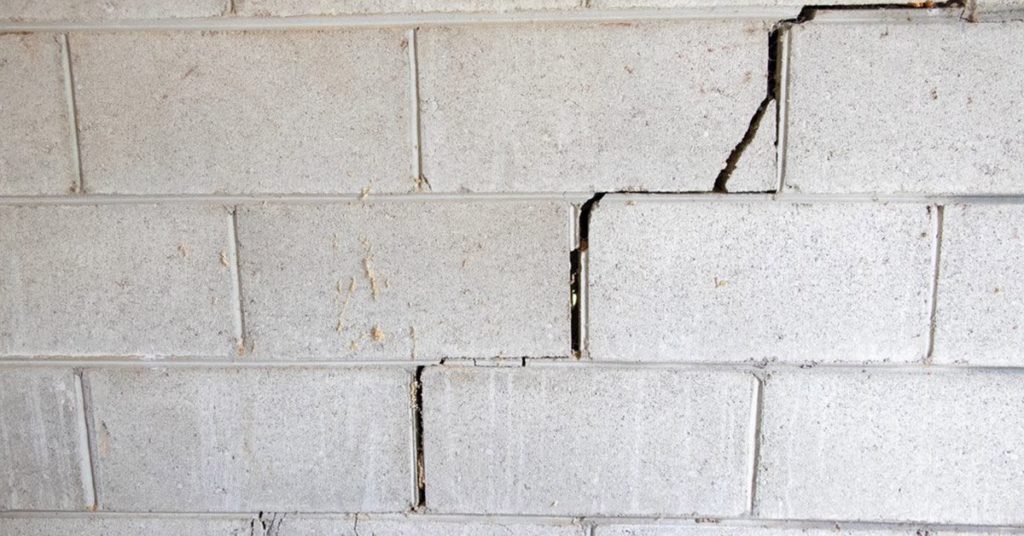
Fact: The most common show stopper for an inspection is problems with the home’s foundation.

Foundation problems are one of the most common reasons for a home inspection to stall. If there are significant cracks in the foundation or the house is settling in an abnormal way, this can cause major structural issues down the road. These problems can be very expensive to fix, so it’s important to have them addressed before you list your home.

Fiction: A small crack in the foundation won’t affect my home inspection.

While a small crack may not seem like a big deal, it can indicate larger underlying problems with the foundation of your home. Even if the crack is insignificant, it’s still something that should be addressed (sealed) before you put your home on the market. Otherwise, you risk stalling the transaction and possibly incurring additional evaluations down the road.

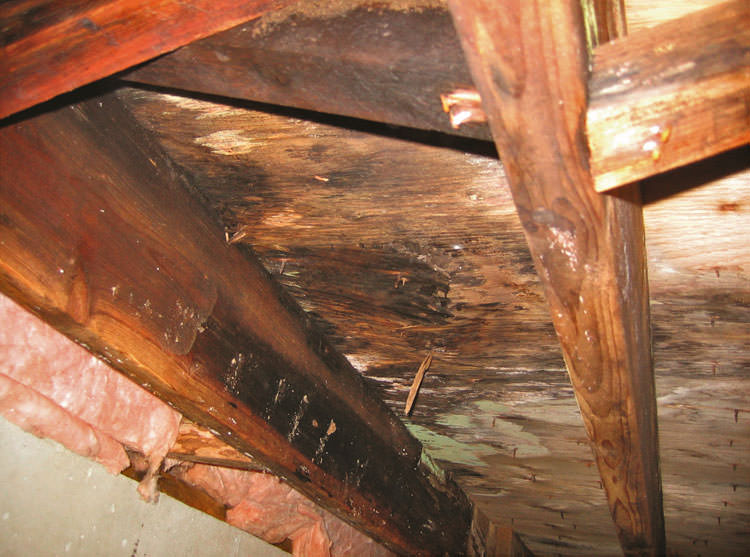
Fact: Mold is another common issue that can cause a home inspection to fail.

Mold is a serious health hazard and it can also cause significant damage to your property. If mold is found during a home inspection, it will need to be remediated before most buyers will be comfortable moving forward with the transaction.

What Buyers Need to Know About Serious Defects

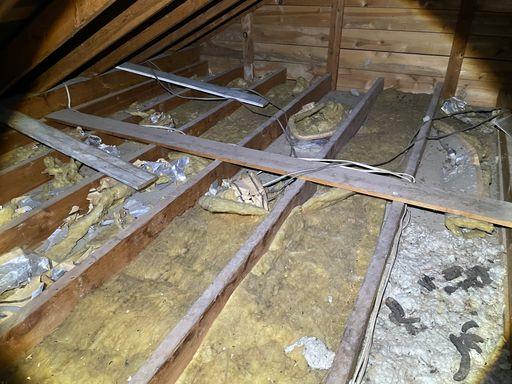
If you’re in the process of buying a home, it’s important to be aware of the potential for serious defects that could be discovered during a home inspection. While many of the items that are flagged during an inspection are relatively minor, some potential problems could have a major impact on your purchase.

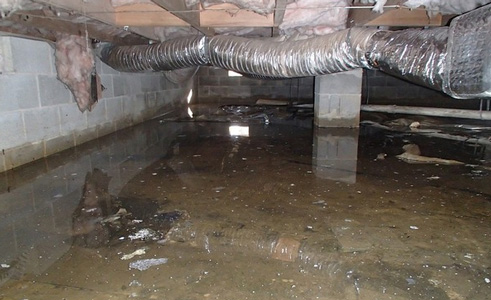
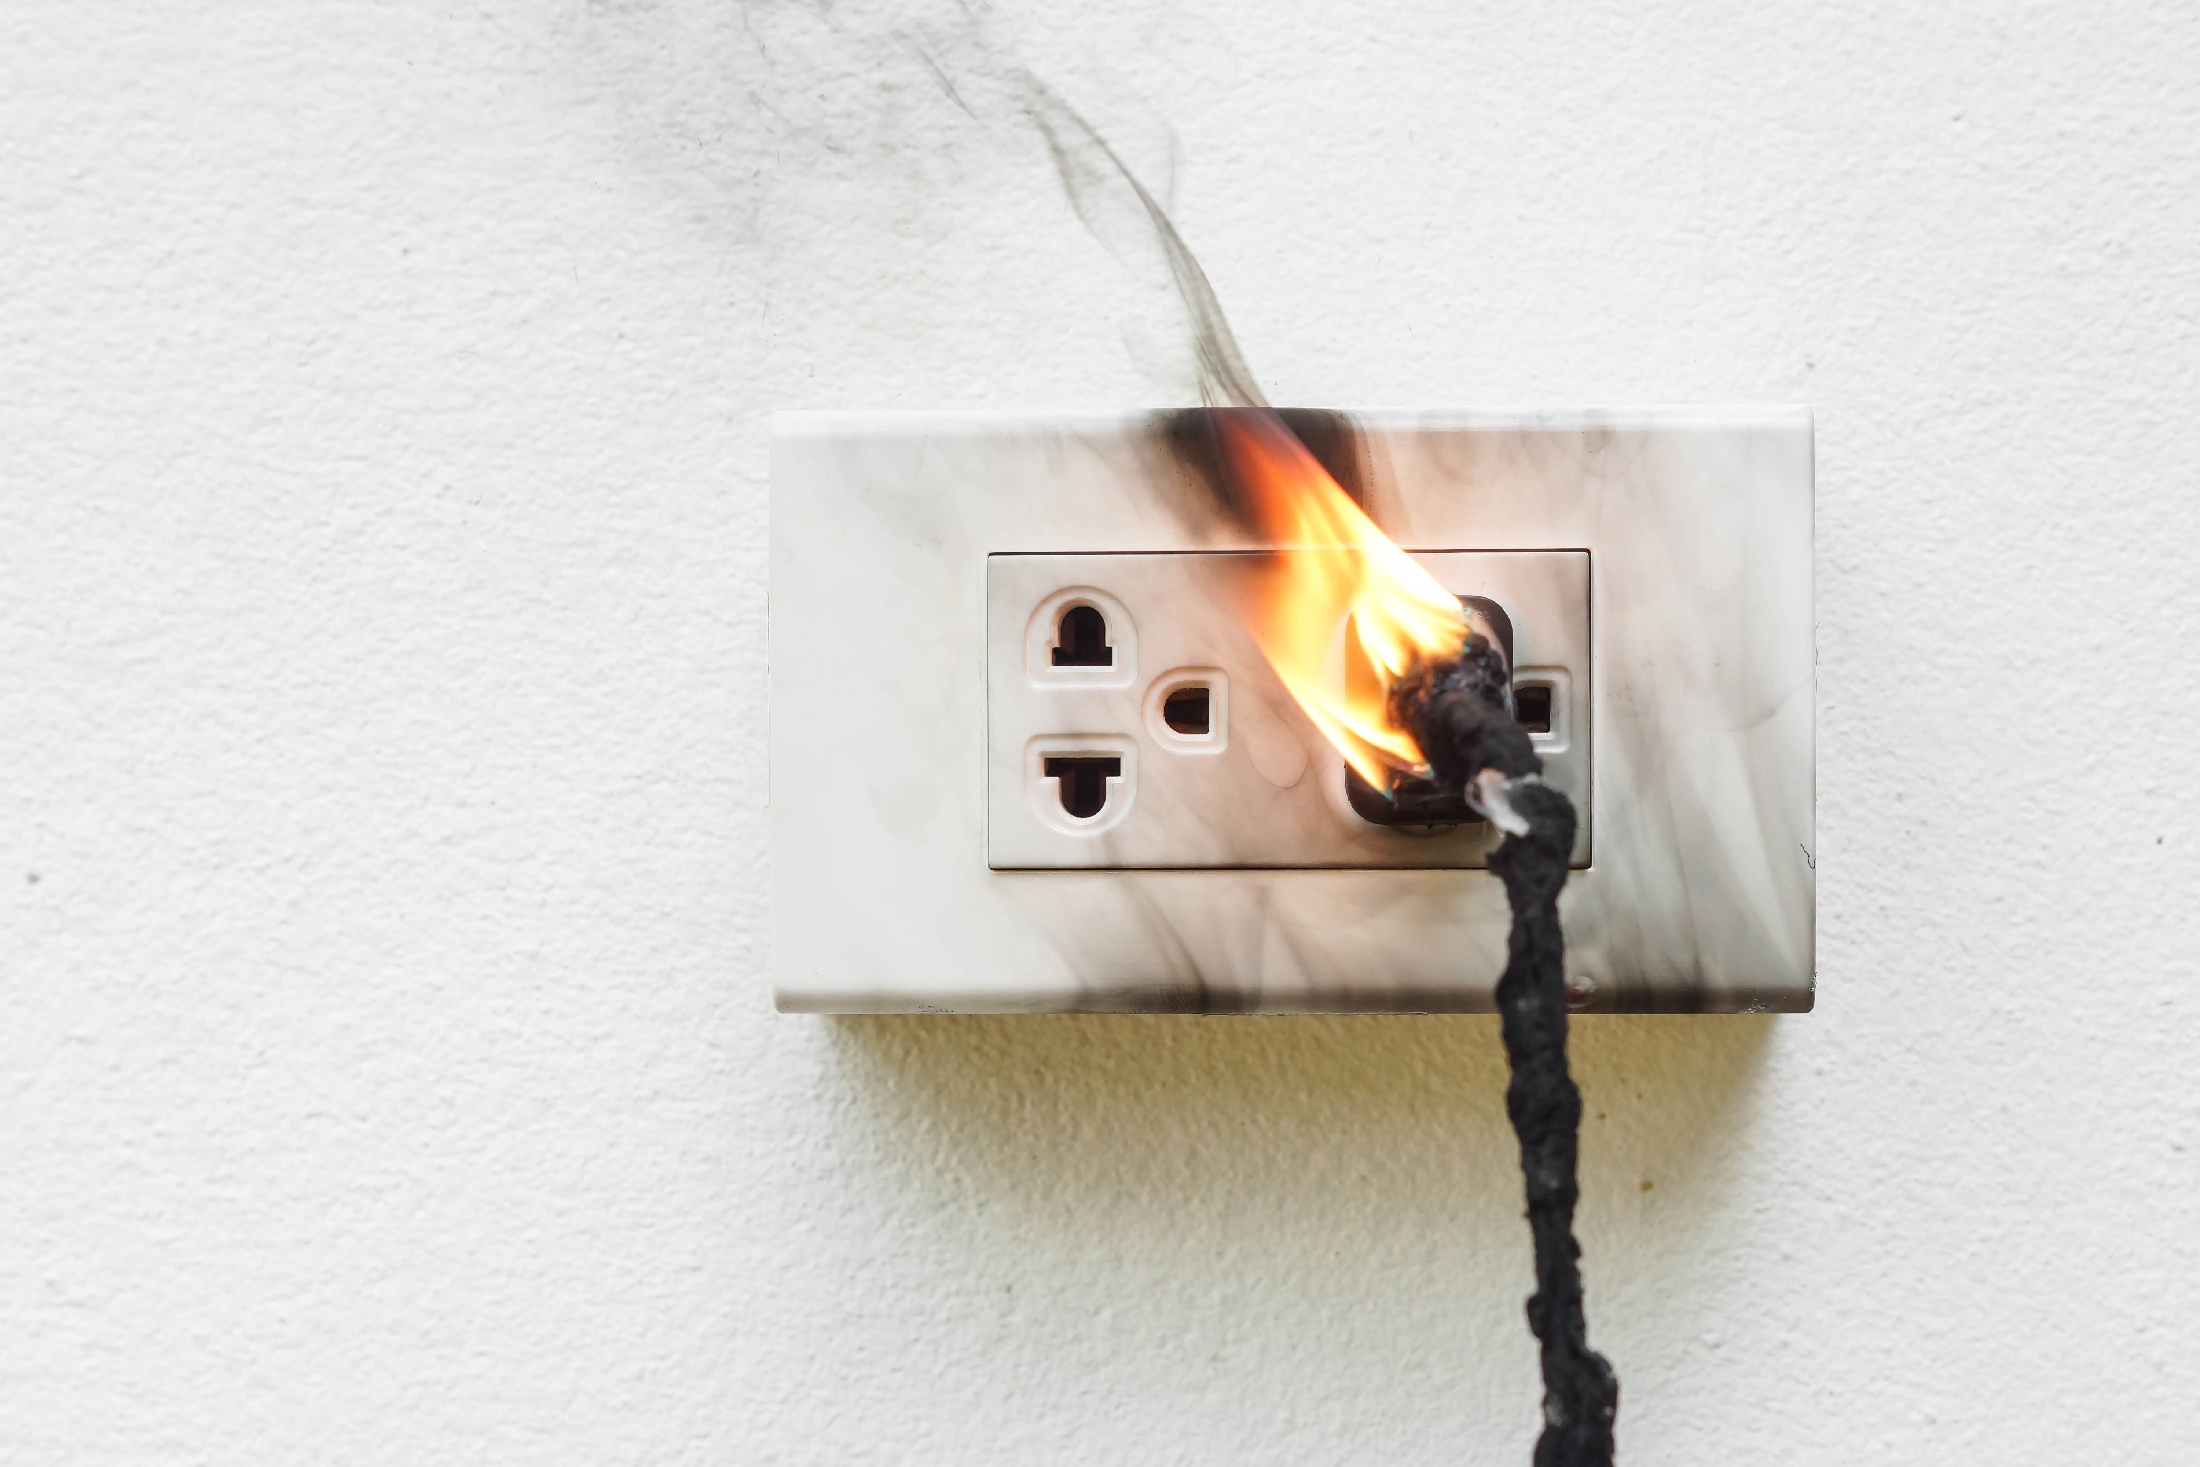
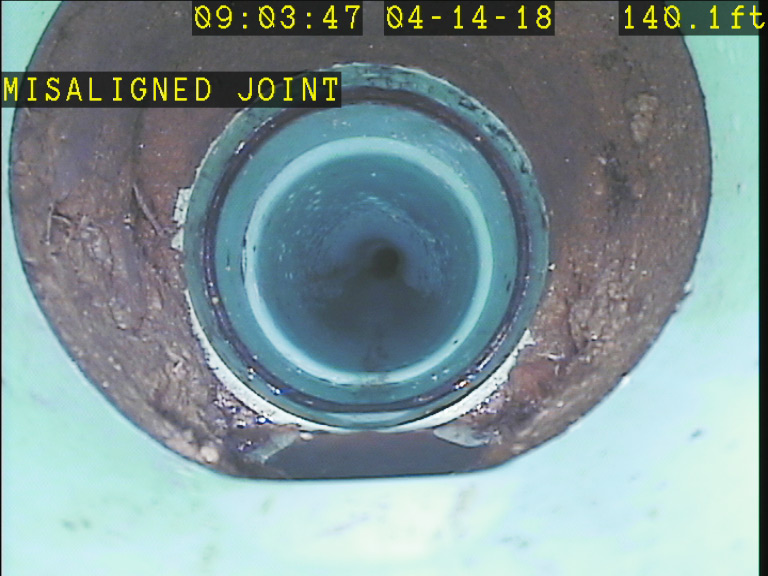
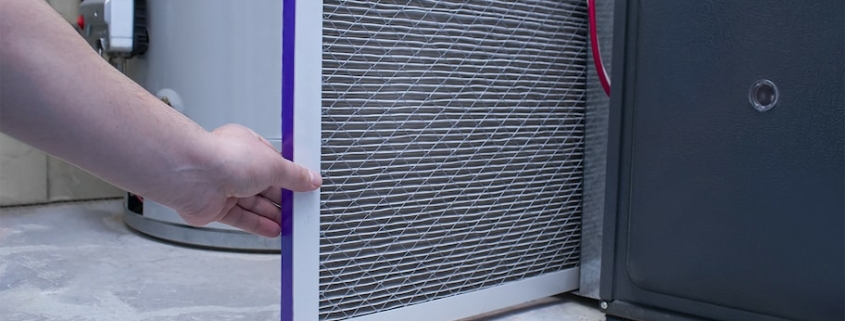
The most common reason for a home inspection to fall apart is the discovery of significant defects related to neglect or deferred maintenance. These can include issues with the electrical system (evidence of overheating electrical components or breakers for example), significant plumbing leaks (that old jetted tub that leaks into the crawlspace), or an inoperative HVAC system. If any of these major systems are found to be defective, it can be costly to repair or replace them. In some cases, the cost of repairs may exceed the value of the system, making replacement necessary. It doesn’t make much sense to repair a 25-year-old HVAC system when an outright replacement may be more cost-effective.

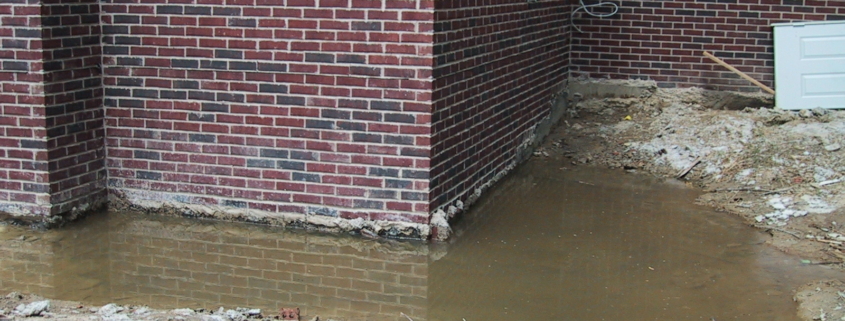
Another reason why an inspection might fall apart is if the inspector finds evidence of pests or other damage. This can include termites, water damage, mold, or other problems that can devalue the property and make it unsafe to live in. If you’re considering purchasing a property that has any of these issues, be sure to get estimates for repairs before making an offer.

Compare and Contrast Different Levels of Defects

We at 3 Arrows Property Inspection use three different categorical levels to help point you in the right direction during your home inspection: Minor Defect, Maintenance Item, or FYI Item, Marginal, and Significant/Safety.

Minor Defects, Maintenance Items, or FYI Items are typically standard maintenance issues (burned-out light bulbs, peeling paint, and window frames that need to be caulked) and do not typically impact the home or transaction in a significant (financial) way.

Marginal defects are more significant and are worth bringing up and correcting sooner rather than later. Most inspection issues fall into this category.

Significant/Safety defects are the most serious type of defect and can pose an immediate threat to the occupants of the home. Any inspection item that falls into this category should be evaluated and repaired by a qualified licensed contractor as soon as possible. Issues that may not pose a safety hazard but may be very expensive to repair may fall into this category as well.

Working Through Objections and Negotiations

There are definitely things you can do to help keep your deal on the table and move forward smoothly. One is to ask the seller to make the necessary repairs before you close on the home. Another option is to get an estimate of the cost of repairs and factor that into your offer price. This way, you’re not stuck with a bill for repairs after you move in. Again, this can be tough to negotiate, but it’s worth considering if you really want the home. Finally, you could always hire your own inspector to take another look at the property before you make an offer.

If you’re in the process of buying a home, you’ve likely heard some horror stories about home inspections. Maybe you’ve even heard that “failing” a home inspection is the kiss of death for a real estate deal.

Rest assured, speed bumps during a home inspection are not the end of the world. It’s quite common. Here are some tips for working with your inspector to make sure that you get the most accurate report possible:

1. Be present during the inspection. This way, you can ask questions and get clarification on anything that you don’t understand.

2. Take advantage of your inspector’s expertise. They can offer valuable insights into potential problems with the property that you may not be aware of.

3. Don’t hesitate to ask for a second opinion. If something doesn’t seem right, or if you’re not sure about something in the report, get a second opinion from a contractor or specialist.

4. Keep an open mind. Not every problem is a deal-breaker. Sometimes, small repairs can be made to address deficiencies noted in the inspection report.

5. Work with your real estate agent to negotiate repairs with the seller. In many cases, sellers are willing to make repairs to help keep the deal moving forward.

Uncovering problems during a home inspection is certainly not the end of the world, but it can be stressful. The best way to avoid this situation is to do your research beforehand and make sure that you are reasonably prepared for things that might come up. If you educate yourself on common home inspection defects as well as prepare yourself mentally, then you should be able to pass with flying colors. With these tips in mind, I am sure that even if disaster strikes and something does go wrong during your next home inspection, it will still be an opportunity for growth and improvement rather than a complete catastrophe!


Introduction

Buying a home is one of the most exciting and stressful experiences you will ever encounter. You have so many questions about what to look for, who should handle the transaction, how to get the best financing terms, etc., that it can be easy to forget about other important details. One of these details is having a home inspection performed before closing on your new home. The benefits are numerous—from helping save money on repairs down the road to gaining peace of mind knowing everything works well at this current moment in time—and they’re all worth considering if you’re buying or selling real estate in any way shape or form!

Even if you aren’t selling your home, it is important to stay on top of necessary maintenance.

Even if you aren’t thinking about selling your home, it is important to stay on top of necessary maintenance. Regular inspections help you identify problems before they become serious and costly issues. A thorough inspection can also reveal hidden issues that may impact the value of your property.

A good inspector will find things that need attention now or in the future, so that when it comes time for an inspection again (or even when you go through the process of buying another home), there won’t be any surprises waiting for you!

The inspector will check for issues that could affect the value of your home.

The inspector will check for issues that could affect the value of your home. If you’re selling, you want to make sure the home is in good shape so that it will sell quickly and for top dollar. If you aren’t selling and just want to keep a comfortable living environment, then an inspection can help identify problems that could cause health issues or even lead to fire hazards (which would not only be dangerous but also cost money).

If there are no major issues with your house after an inspection, then one less thing has been taken care of before moving forward with any other plans!

When you have an inspection performed, a list of the items inspected is provided and shows you what needs attention.

There are many reasons why you should have an inspection performed on your home. If you’re planning to sell the property, having it inspected can help ensure that the house you are selling is in good condition. The inspector will provide a list of items that need attention, whether they be repairs or maintenance tasks such as cleaning gutters or replacing filters in HVAC systems. This way, when potential buyers come through for their walkthroughs, there aren’t any surprises waiting for them!

If you’re not planning on selling but would like some peace of mind about what condition your home is currently in (or isn’t), then getting an inspection done could be useful too! It’s important for homeowners everywhere – regardless if they’ve recently bought their first home or have been living there for decades – because we never really know when something may break down unexpectedly until after it happens…and by then it might be too late.”

An inspection can give you peace of mind knowing that everything is in good working order.

The main reason to get a home inspection is peace of mind. If you know that everything is in good working order, there’s no need to worry about future problems or expensive repairs.

When buying a house, it’s easy to have blinders on when looking at the property itself–you can get caught up in how beautiful it is and forget that there may be issues hiding behind closed doors or under the floorboards. A professional home inspector will go through every inch of your house with a fine-toothed comb, checking for leaks and cracks in pipes; noting any wear and tear on electrical fixtures; inspecting windowsills for rot; looking under sinks for signs of water damage (and making sure they’re properly secured); etc…They’ll even check things like light switches/outlets/circuits for safety issues (such as loose connections), which could potentially save you from having an electrical fire down the road!

A homeowner should always keep up with routine maintenance checks on their property’s systems, including heating and air conditioning, plumbing, energy efficiency, electrical wiring and more.

Regular inspections can help you keep your home in good shape and prevent major problems. They also allow you to stay on top of important maintenance tasks, such as replacing the air filters or checking faucets for leaks. Finally, they allow you to find out what needs attention before it becomes an emergency–and that’s especially important if you live in an older home with aging systems.

If there is any damage during an inspection, it may be minor enough that repairs are affordable without selling your house (for example, repairing a cracked window pane). But if more serious issues arise during an inspection–such as mold growth caused by water damage–you may need more money than what you could get from selling your house at this time (or perhaps ever). In this case, having access to funds from other sources could mean the difference between being able to fix these issues or being stuck living with them indefinitely

Conclusion

So, the next time you think about having an inspection performed on your home, don’t let the thought of selling it stop you. Even if you aren’t planning on moving anytime soon, it’s always a good idea to stay on top of your property’s maintenance needs and get them taken care of before they become major problems that cost more money than expected. And who knows? Maybe this little checkup will give you peace of mind knowing that everything is in good working order!

Introduction

The purchase of a home is often the largest investment you’ll ever make. It’s also a huge responsibility—one that comes with many considerations and anxieties. You have to consider how much you can afford, whether your family will like the neighborhood, and even how many bedrooms are in the house. One thing that doesn’t always get as much attention is making sure that your new home isn’t falling apart before you even move into it! That’s where home inspections come in: they’re an opportunity for professionals to look over your potential new property and give you peace of mind about any issues they find that could pose problems later down the road (like water damage or mold growth). However, not all issues found on home inspections are created equal—some can cost thousands upon thousands of dollars to fix while others aren’t as costly or even necessary for repair. So what exactly should a buyer expect when having their new abode inspected? Below we outline eight common issues found during home inspections:

Mold growth

Mold growth can be dangerous, and a home inspector will look for signs of it during inspections. Mold is common in damp areas like basements, bathrooms, or crawl spaces. It can also be found growing on walls or ceilings as well as in carpets or on furniture.

Mold can cause respiratory problems such as asthma and allergies. In rare cases, it may even lead to more serious infections like eye infections or skin rashes (also known as allergic contact dermatitis). If you have an allergy to mold then this is something that should be considered when looking at homes with potential mold issues.

Mold grows best in warm temperatures so inspecting your home during fall/winter months will help you identify any possible sources of moisture before they start growing out of control over the next few months!

Water leaks

Water leaks are a common problem in homes, and they can often be difficult to detect. There are several different types of water leaks that can occur:

  • Leaks around windows and doors
  • Leaks from the roof or ceiling
  • Leakage on pipes or under sink fixtures

Water leaks can lead to mold growth, mildew growth, rotting wood, structural damage, and even electrical problems. Water leaks should be checked for as soon as possible because if left untreated for too long it could cause foundation issues or flooding.

Insulation deficiencies

Insulation is a must for energy efficiency. Adding insulation to your home can help you save on heating and cooling costs. You may want to consider insulating an existing home or adding insulation to a new home. Insulation can be added to the attic, walls, and floors of your home. If you have a basement, you may also want to add insulation there so that it stays dryer than normal basements tend to be

Electrical problems

Electrical problems can be a fire hazard, and they’re not always easy to fix.

  • Electrical problems are fairly common, but they can also be expensive to fix.
  • It’s best to try and avoid electrical problems by planning ahead and having your home inspected before you buy it.

Cracked foundation problems

Foundation cracks can be caused by a number of issues, including:

  • Poor drainage
  • Water pressure from irrigation systems
  • Ground shifts that occur over time due to changes in soil temperature, moisture levels and erosion

If your home inspector finds cracks around your foundation, there are many ways to repair them. The cost of repair will depend on the size and depth of the cracks. Cracks can also be an indicator of other foundation issues so it’s important for you to contact an expert who can assess whether or not your home needs additional work done.

Negative drainage

Negative drainage is when water flows away from the house. This can lead to basement or crawlspace moisture, which can damage your property and be a breeding ground for mold and mildew.

A home inspector must look for signs of negative drainage, including:

  • Poorly draining front and backyard areas that show standing water after a rainstorm.
  • Sunken areas in your lawn, indicating poor grading or surface drain problems.

Although it’s hard to fix this issue without major renovations, there are a few things you can do to prevent it:

Landscaping problems

If you’re considering installing a water feature or plan to build a deck, you should be aware that many homeowners make the mistake of not having proper drainage in place. This can result in water pooling on your property, which can lead to ponding and soggy soil that alters the landscape’s appearance and potentially damages your house’s foundation.

Another common landscaping problem is an overgrown lawn or garden. If there are large areas where grass has been allowed to grow without being mowed or trimmed for some time, it may be difficult for you to maintain your yard properly going forward because it will require more attention than would otherwise be necessary during this time period when you are trying hard to keep up with all of your other duties as well as handle any renovation projects underway at home such as kitchen remodeling projects that require new cabinets installed throughout much larger areas than originally anticipated before starting work so there was no room left over from our initial estimate given by another contractor who didn’t know what they were doing

Plumbing leaks

If you have a plumbing leak, it could be costing you more than just the water bill. A leaking pipe can cause damage to your home and even lead to mold growth. Plumbing leaks are often hard to spot, so it’s important that your inspector checks for them during their inspection of your home.

  • What causes plumbing leaks?

The most common cause of a plumbing leak is when a pipe becomes corroded or otherwise damaged over time. This can happen due to age, wear and tear from being exposed to harsh chemicals or high heat (such as hot water heaters), or simply poor installation practices by subcontractors at the time of construction/remodeling projects.

Common issues found during home inspections are sometimes costly to fix.

Common issues found during home inspections are sometimes costly to fix.

  • Mold: This can be an expensive problem, depending on the severity of it. You may need to replace drywall or flooring and possibly the entire bathroom if it’s not salvageable.
  • Water leaks: If your home has a leaky roof or plumbing issue, you will likely incur significant damage in your home over time from water damage and mold growth.
  • Insulation deficiencies: If your attic isn’t insulated properly, your utility bills could skyrocket by $200-$300 per month!
  • Electrical problems: Electrical shorts/faults often lead to fire hazards as well as shorted-out appliances like lights or electrical outlets that cause them not to function properly at all! Be sure these issues are fixed so they don’t become a problem later on down the road!

Conclusion

Home inspections are beneficial for both buyers and sellers. Buyers can get an idea of what’s wrong with a house before they buy it, while sellers can take advantage of their knowledge to make necessary repairs in order to sell their homes quickly at the best price possible. If you want to avoid spending money on costly repairs later down the road, it may be worth getting one done right now!

As a new construction home buyer, you want to know that your investment will be safe and comfortable providing years of enjoyment. While I’m sure you’ve thought about the most important features of your new construction home (like a big kitchen or spacious bedrooms), there are many things to look out for when buying so make sure you ask questions!

Know the limits of your builder warranty

Most reputable builders in Middle Tennessee offer two different warranties on new construction homes. This article will not talk about express or implied warranties (you can find out more about those through this link) but construction warranties but will highlight typical new construction warranty practices.

Most builders offer a 1 to 2-year inclusive warranty (bumper to bumper sort of thing) on everything from cosmetic issues, carpeting, mechanical problems/failures, etc. Builders are also required, by Tennessee state law, to offer a 10-year structural warranty which covers the structural performance of your new home. As reported by 2-10 Warranty Company, the average cost of a home builder’s warranty structural claim ranges between $42,000 to $113,000.

Examples of unhappy new construction buyers can be found if you are looking but as with most things in life, the unhappiest of folks tend to be the loudest. The bias of review websites is heavily tilted toward angry consumers but there might be some truth in all that noise. Have you thought about checking out your builder’s reputation online at places like this?

Check the grading around your home

You may be thinking, “what’s the big deal with grading? It’s just dirt.” But don’t let this fool you. Grading is an important aspect of your home and can have an impact on the foundation, mold, structural movement/settlement, and other things that can cost a lot of money.

Checking the grading around your new construction home will ensure that there are no drainage issues, standing water issues, and more importantly that there are no drainage problems on or near your property line.

The consensus seems to be that a good slope to aim for when grading land extending out from a house foundation is about 6 inches of drop in the first 10 feet (that translates to a “slope” of 5 percent). Many professionals grade land successfully using a lesser slope than that, but those who wish to be on the safe side err in the direction of the greater slope.

Look out for soil settlement or what professionals refer to as “incompaction of fill.” During construction, a large hole is dug to construct the foundation footers. Inevitably the dirt that is filled back in around the foundation walls will settle in the first year or two and new dirt needs to be added to maintain proper grading and to help make sure water drains away properly.

Look out for common electrical slip-ups

Check for excessive gaps around electrical panels and receptacles (outlets). Typical safety standards require no more than a 1/8-inch gap.

Make sure any electrical panels are improperly installed and well secured to the wall. The electrical panel needs to be installed in a safe location, away from water sources (such as bathtubs) and other heat sources (like fireplaces or ovens), and are not typically allowed to be installed in closets or other areas containing combustible material.

Check for the presence of ground fault circuit interrupters (GFCIs) in the bathrooms and kitchens and arc fault circuit interrupters (AFCIs) in sleeping areas, which help to prevent electrocution by cutting power if there’s a dangerous short circuit or current leak somewhere else in the house (think: pinched electrical cord in a door jamb). This prevents deadly shocks while also preventing fires caused by this type of problem!

Kitchen islands are notorious for not having enough (or ANY) receptacles and are a pet peeve of mine. Who wants to have a dinner party and be stuck stringing extension cords to your kitchen island for things like blenders and crock pots?

Scope the main sewer lineSewer scope revealed city main connection was damaged.

If you are purchasing a new home and want to be sure that everything is in good working order, then you should have the main sewer line scoped (inspected) before you move in. Inspecting the main sewer line involves putting a long (sometimes up to 200 feet) fiber optic camera down the main sewer pipe to check for proper pitch, grading, flow, and to check for obstructions (typically construction debris like paints, industrial paper towels, and other obstructions). You would be surprised how often contractors flush prohibited items down the toilet! Installation problems (crushed lines, sun-damaged PVC pipe, and pipes with bellies or low spots) are also common and can be easily missed without a thorough sewer scope.

The photo above is a screen capture from a sewer inspection I performed on a new construction home in 2018 where the sewer pipe pulled loose near the city main connection under the driveway. Thankfully this issue was found BEFORE moving in because the builder had to crack up the driveway, and part of the street, excavate the damaged area, repair the pipe and then put everything back together. Not an easy task and it would have cost my client over $15,000.

Be aware locating and correcting sewer line problems can be very invasive and costly. If you wait to find these problems till after you move in, repairs could be very messy and disruptive to normal living (think cracking up your garage floor to fix a broken pipe).

Pay close attention to the walls for any problems

Inspect the walls for any problems. Smooth drywall will whisper a story if you are listening (sometimes drywall will scream if problems are big enough). Walls should be solid and free from cracks, gaps, or other issues that could lead to water damage and electrical problems.

Check for insulation gaps. If you see spaces between your studs and their corresponding insulation, there’s a good chance that an air leak is occurring. This can cause higher energy bills and a chilly living environment in the winter months when you’re trying to stay warm with your heating system.

Look for water damage inside concrete slabs that line your home’s foundation walls or crawl space area (if applicable). This will not only cost more money to repair later but may also mean there was a safety issue during construction—which would need immediate attention before moving in.

Air ducts should be checked clean and in good working order

Before you move into your new home, make sure the ducts are sealed, insulated, and free of debris/trash. You should also check that they’re not damaged or leaking. If there is mold or mildew on the ducts, this could indicate a problem with how they were installed. If your builder hasn’t ensured that all their work was done correctly, it’s probably best to have them come back and fix any issues before you move in.

Make sure all plumbing fixtures are working properly.

Make sure the water heater is working properly. This will ensure that you have hot water when you need it.

Check to make sure all the plumbing fixtures are working properly—sinks, toilets, showers, and faucets. All these things should be in good condition and be easy to use.

Look for leaks. Leaks can waste a lot of money on bills as well as cause damage to floors or walls around your home if they go unnoticed for too long so if you see any signs of leakage ask a professional plumber to come out and look at them ASAP!

Make sure that windows are functioning properly and leak-free.

When you’re looking at a new home, make sure that the windows are functioning properly and leak-free.

Make sure that the windows are properly sealed. This can be done in two ways: with caulk or by adding foam insulation around the edges of the window frame.

Make sure that there aren’t any leaks in any of your new windows, either air leaks (holes where cold air comes through) or water leaks (where rainwater sneaks into your home). Leaky windows will not only waste energy but also cause mold growth if left unchecked for too long!

Look out for improper installation: if a window isn’t installed correctly, it may open and close improperly or even fall out completely!

Make sure that all appliances have been installed properly and are functional.

When it comes to appliances, look for things like:

  • A stove that has a smooth surface that’s not cracked or damaged.
  • A refrigerator with no dents or scratches on the doors or interior.
  • An oven that lights up and quickly reaches operating temperature.

You want your appliances to be durable and efficient, but don’t overlook the aesthetics of these items either.

There are many things to look out for when buying a new construction home so make sure you ask questions!

Asking the right questions is an important part of building your dream home. A good builder will be able to answer all your questions, but if they seem hesitant or don’t have a good response, it’s time to start asking more questions.

Did any problems arise during construction that were not caught by the inspector?

Did you notice any issues with the house after moving in?

Do you have any other recommendations for builders who provide this type of service?

After asking these (and any other) questions it’s important for both parties involved in the transaction to feel comfortable with each other and their answers. If there are still doubts about a potential builder, ask him/her for references from previous clients or other builders he/she has worked with before on similar projects.

New homes tend to eliminate one set of problems (worn out flooring, old(er) appliances, and HVAC equipment for example) but can easily bring on a whole new set of issues (unused plumbing can start to leak after moving in, sewer lines can back up due to construction debris jammed into the drain by that tile contractor, wiring and plumbing can be damaged during construction and not manifest until months or years after moving in). Please consider having a professional home inspector represent you in your new home purchase. Tom with 3 Arrows Property Inspection has personally inspected hundreds of new construction homes since 2005 and knows where problems typically crop up. Builders and their sub-contractors have a very tall order when building a new home and things will get overlooked and missed. The key to a happy new construction purchase is transparency and a thorough inspection! We hope that you have found this article helpful and that it will make your home-buying process more enjoyable and less stressful.

Have you ever thought about your home’s foundation or drainage system? Chances are if you’ve owned a home for more than a year, you probably should. Proper attention to the foundation and drainage system will help prevent future problems.

Having a home inspection to identify and correct foundation drainage deficiencies will help protect your home. As the owner and lead inspector here at 3 Arrows Property Inspection, I have seen way too many homes with unhealthy moisture problems due to improper grading and drainage. These deficiencies may not be visible at first, but if ignored they can lead to soil erosion and subsequent foundation stress and cracking, or worse; partial or complete structural failure of your house. Identifying these issues early on in your home ownership journey can help protect your investment.

Drainage is an important aspect of a home’s foundation. If your home has poor drainage, it can cause problems in the long run. Poor drainage leads to water damage and mold, which can be very expensive to repair.

Here are some things you can do to improve the drainage around your home.

  1. Establishing and maintaining proper exterior grading is the single most important thing you can do to help your home’s foundation last a long time and continue to perform as it was designed. Remember, your foundation is holding up the house and dirt is holding up the foundation. If through soil erosion, that dirt is disturbed or moved, everything around it will shift and could drop translating into the unwanted movement of your home.
  2. Clear out any debris from the gutters and downspouts in your yard. This can help prevent any clogs from forming in these areas. Clean and free-flowing gutters are the first line of defense against ponding water problems at your foundation.
  3. Check for any clogs in the pipes leading from your house to the street or storm drain. This may be caused by leaves or other debris that have built up over time. If there is a clog, remove as much as possible with a rake or shovel then call a professional plumber or contractor to come out and clean it out completely. You should also check for any cracks or holes in pipes leading away from your house; if you find any of these issues, have them fixed right away so that they don’t lead to bigger problems down the road!
  4. Check all drains inside your home regularly (such as sinks) and make sure they are draining properly; if they aren’t working properly then call a plumber immediately so your drains don’t back up potentially flooding your crawlspace or basement.

If you’re a homeowner, you know all too well how common problems in your yard can be. In fact, one of the most common complaints by homeowners is drainage issues. At first, these issues may seem small, but they can develop into larger problems over time. With so many adverse effects of poor drainage, it’s imperative that you take action as soon as you experience a problem. Thankfully, we’ve outlined a few effective ways to improve the drainage around your property.

As always, if you have any questions or concerns, please reach out to our office at 615-588-6689 and we are glad to be of service in any way!

Introduction

When it comes to the comfort of your home, there are few things more important than a properly functioning furnace filter. It keeps the air in your house clean, so you don’t have to worry about dust or other debris circulating throughout your abode. Regularly changing the filters in your furnace is essential for maintaining good air quality, but you should also make sure that you’re replacing them with the right size and type of filter. Changing out your filter regularly will ensure that it continues to work properly and protect against pollutants from entering into your home’s interior space.

Turn off the electricity to your furnace.

  • Shut off the power to your furnace.
  • If you have access to the breaker box, turn off that circuit breaker for a minute or two.
  • If there is an electrical fuse box in your home, pull out any fuses in that circuit and leave them out for a few minutes.
  • Open up the filter compartment of your furnace and remove the old filter (if applicable), making sure to put it somewhere safe where it won’t get dirty or damaged while replacing it with a new one later on!
  • Carefully remove as much dust and debris from the inside as possible by brushing around with a broom handle until all visible buildup has been removed from within before installing new filter(s). Be careful not to damage any other parts like wiring when doing so though!

Locate your furnace filter.

The first step to changing your furnace filter is locating it. You will find the furnace filter in one of three places:

  • In the air ducts (where warm air travels from the furnace through holes in the ductwork)
  • In a return vent for an individual room or zone within your home (these are often located near windows or doors)
  • In an air return (a large, box-like structure that collects and distributes cooled air throughout your home)

Remove the old filter.

  • Remove the old filter.
  • Unscrew the filter from its housing, and pull it out of the unit. You may have to clean off any dust or dirt that’s accumulated on either side of the filter before you remove it from its holder; this will make installation easier later on.
  • Install a new one—and don’t forget to clean it first!

If you skipped step 1, go ahead and do this now: install a new furnace filter with your hands or pliers (if necessary). If not done already, wipe down both sides of the new filter for easier installation next time around. Don’t forget about cleaning off any excess dust/dirt from both sides of your current furnace and its housing unit before proceeding to Step 3 below!

Check your owner’s manual for the right size and type of filter you need.

Check your owner’s manual for the right size and type of filter you need. If you don’t know where your owner’s manual is, check with the manufacturer or ask someone who works at a hardware store where they might keep records of which filters work best with their equipment.

Install the new filter with the arrows pointing toward the blower motor.

  • Make sure you have the right size filter. The filter should be slightly larger than your furnace’s air inlet opening.
  • Make sure you have the right type of filter. Use a pleated or high-efficiency particulate arrestor (HEPA) filter for best results, as they are specifically designed to trap dust and other particles that may otherwise circulate through your home or office. Some filters come with center grids while others do not; if you’re unsure which arrangement is best for your home, consult with an HVAC technician before purchasing replacements.
  • Make sure you have the right filters for your furnace. Don’t forget about any other heating systems in your home—you’ll also need replacement filters for those!

Replace the doors or panels on your furnace and restore power to your furnace.

  • If you have a gas or oil furnace, check the pilot light first to see if it’s working properly.
  • Turn on your circuit breaker and flip the main switch back on; this should restore power to your furnace.
  • Wait at least 15 minutes before trying to turn on your furnace again—this gives time for all of its components to cool down and allows them to operate properly again when turned back on.

Mark your calendar for when you need to replace it next time, using a highlighter or other marker that will remind you how long it’s been since the last replacement.

Mark your calendar for when you need to replace it next time, using a highlighter or other marker that will remind you how long it’s been since the last replacement.

  • Use a calendar. If there are no markings on your filter, use a pencil to mark the date of its last change in large letters on the top or side of the filter.
  • Make a note on your phone, tablet or computer. A reminder might say something like “Change furnace filter” along with today’s date, or just “Filter.”

Wash out any air registers in your home that are dusty, at least once a year, more often if you have pets or smokers in your house.

Changing your furnace filter is a great way to keep your home comfortable, but it’s also important to know when you should replace it. Here are the guidelines for how often you should change your filters:

Every month – if you have pets or smokers in the house

Every 3 months – if dust is noticeable on surfaces around your house (like floors)

Every 6 months – if mold has formed on walls or ceilings

Every 12 months – if there are cracks in the paint or woodwork of your home

Every 2 years – if you have allergies, asthma or other respiratory problems that might be exacerbated by dust and pollen particles in the air you breathe; if there is visible mold growth inside; if there are signs of distress on window sills etc., such as peeling wallpaper or wallpaper curling up at edges; or if homeowners hire professional cleaning services to clean their homes more than once per year

MERV ratings aren’t everything but changing your filters correctly is essential.

MERV ratings aren’t everything but changing your filters correctly is essential. MERV ratings are based on particle size and not the type of filter.

You need to change your filters regularly.

Need help buying the correct furnace filters?

We found this site to be particularly useful when researching filter efficacy and efficiency. You can find it HERE.

Conclusion

Replacing your filter is one of the easiest ways to improve the air quality in your home. It’s also one of the most affordable and effective ways to keep your furnace running smoothly for years to come. If you’re not sure how often to change it, consult your owner’s manual or call someone who can advise you on whether it needs replacing now or later.

Guard Home Warranty

3 Arrows Property Inspection has teamed up with Guard Home Warranty – one of the largest home warranty companies in North America to offer FREE 30-day home warranties to all of our inspection clients!


What is a Home Warranty and how does it work?

A home warranty is a service contract that covers the repair or replacement of appliances and home systems that break down over time. From air conditioning systems to kitchen appliances, home warranty plans help cover damage and malfunction caused by everyday wear and tear. When something that is covered by a home warranty contract breaks down, the homeowner puts in a Service Request Ticket with us and then selects a licensed service provider of their choice to examine the problem. If it’s determined that the needed repair or replacement is covered by the warranty, we will authorize the contractor to complete the work. As a covered homeowner, you only pay a small service call fee, similar to a deductible.

What are some of the benefits of a Home Warranty?

Home warranties are a hedge against expensive repairs and the uncertainty that inevitably comes with homeownership. By budgeting a little every month for the coverage, you can be protected against large financial costs by having to repair or replace the major systems in your home like the furnace, water heater, electrical panel, etc. Good home warranties even cover appliances like dishwashers and refrigerators. A few years ago the compressor failed in my refrigerator and I was told by a local repairman that it would be over $900 to repair! Thankfully we had a home warranty that covered the repair and when it failed again, Guard Home Warranty came to the rescue and made it right by replacing the refrigerator.

No one wants to purchase a home only to have the air conditioning system (A/C) break in the middle of their first summer living there. Home warranties are designed to give you peace of mind about things like that.

Here’s how a Guard Home Warranty can help:

  • Protects you from unplanned expenses. A warranty could help you cover the cost of repairing expensive appliances and systems that break down when you don’t have the money to cover it yourself.
  • Saves you time and hassle. If a home system or appliance breaks, all you have to do is make a claim with your warranty company and they’ll handle the rest. You don’t have to waste time collecting contractor quotes or tinkering with repairs yourself.

Forbes magazine recently published an article about the benefits of home warranties. Perhaps they are a good fit for your home and your family! Scan the QR code to sign up today!

How to Get Ready for a Home Inspection


The process of home selling is full of uncertainties. You can never be so sure until you pass the home inspection stage. That is because the report of a home inspection can alter the property’s price. Sometimes, it can even make it difficult to sell the house and this is a nightmare for home sellers.

Your home’s curb appeal may attract buyers, but as Alltrade Properties explain, it is the property’s condition that determines whether you will sell it. Before the home inspection stage, the seller has complete control over the sales process. But this is often short-lived as the home inspection relegates the seller to an observer. Home sellers do not want this.

However, you can still retain some control or influence over the home inspection result if you follow our recommendations. As a home seller, you need to play a proactive role during the inspection process. It would be best if you get a pre-listing inspection. We also recommend that you apply the following tips while preparing for a home inspection:

1. Declutter, clean, and clear all access points

The home inspector needs free and easy access to every part of the property. If clutter prevents them from accessing critical areas, it will hurt the home inspection report, and buyers will become suspicious.

Also, a dirty property translates to poor maintenance. So it is essential to clean, declutter, and clear the access points. We recommend that you perform deep cleaning. It can be a tedious and technical process, so it would be best to hire professionals.

Keep the building’s perimeter free of clutter. Doing so will enable the inspectors to access the foundation, appliances, walls, and windows. It would be best if you do not forget the attic and basement during the cleaning. All the access points to the crawl space and attic should be clutter-free. The appliances in your kitchen require deep cleaning as well. Ensure that the HVAC filters are clean and functional.

2. Test the function of the home’s systems

During a home inspection, the inspectors will check the functionality of the essential systems in the home. For this reason, it would be best if you test to check if they are functioning.

Inspect the heating ducts to know if they are connected and intact. Check if the ducts are venting out of the attic. Flushing the toilets will help you notice the presence of blockage or slow drains.

Check the water pressure by running all the faucets at once. Test the light switches and bulbs to know if they are working. Inspect your doors and windows to assess the condition of the weather stripping, locks, and seals. Also, examine the functionality of your garage door by testing the remote, manual, and reverse safety mechanism.

3. Make the necessary repairs and replacements

After testing the systems or having a pre-listing home inspection, you may discover areas that require repairs or replacements. The essential ones to consider include:

Roof repairs – Ensure that the roof gutters and downspouts are functioning. That will involve removing debris, lichens, or moss from the roof. Repair every hole or cracks that may cause leaks and replace damaged or missing shingles.

Insulation – Make proper additions, replacements, or repairs if you discover inadequate, damaged, or missing shingles.

Electrical fixtures – Ensure that all your light bulbs, switches, and exhaust fans are in good condition.

Kitchen and bathroom – Replace or repair all damaged cabinets. Fix all plumbing leaks and ensure that the caulking is in perfect condition.

Water damage – If you notice any water damage, trace the cause and repair it.

Doors and windows – Ensure that all your doors and windows are in good condition. The weather stripping, latches, doorknobs, and seals should be intact.

Foundation  Repair all minor holes or cracks in the foundation.

4. Inspect the home’s safety features

The safety of every home is essential and home inspectors will not overlook it. Here, you need to consider:

  • Pest and rodent extermination. You can do this by hiring professional exterminators.
  • Cap flues and chimneys to prevent animals, pests, or debris from entering them.
  • Test the smoke detectors and carbon monoxide alarms using the self-test function. Also, replace dead batteries and expired detectors.
  • Examine your fire extinguisher to be sure that they are working. Note the gauge and expiry dates.
  • Shut off unused gas lines and cover the caps.

5. Final preparations

As part of the final preparation, you will:

  • Provide all the maintenance records for the property.
  • Sketch a map to show all the hidden areas in the house.
  • Make proper labels of electrical boxes, keys, and remote controls.
  • Ensure that you connect all the utilities and keep the pilot lights on.

Bottom line

The home inspection will last for at least three hours, and during this time, you will be away from the property. If you make the necessary preparations, the process will be smooth, giving you positive results.


With the end of summer looming on the distant horizon (we aren’t excited either) there are some things we can do to help maintain and improve the value of our home.

1. Check your roof and your home’s exterior and make any necessary repairs.

Your roof system is the second most expensive component in a house (next to your foundation) and protects not only the structure but also the home’s contents. Start with inspecting around the eaves for loose debris that might have accumulated there. Whenever you see gunk or leaves, collect and remove it. Next, inspect your roof’s flashing or metal strips typically found around chimneys, vents, satellite dishes, and skylights. It can loosen during a harsh rainstorm or hailstorm, causing potential water leakage. Finally, inspect the covering itself – the shingles, tiles, or metal panels. Check for impact damage, loose sections or fasteners backing out. If you do climb up there – please be careful or hire a competent professional to check it out on your behalf.

2. Give your deck a once-over.

Check your deck system for any rot or age-related damage. Have them replaced. Pour water on your deck to see if the boards should be resealed. If the water beads into small puddles, it is okay. If it sinks into the wood, you should reseal it to protect against water damage. This is also a good time to check for loose fasteners or evidence the deck could be pulling away from the house.

3. Clean your grill

Gas grills: Close the lid, turn the heat up high, and let the grill cook for about half an hour. Then, let the grill cool. Use a grill brush to sweep the inside and wipe down the outside with a sponge and cleaner. Then clean out all the drip trays.

Charcoal grills: Empty the grill racks and wipe away any dust or residue. Use hot water, dish soap, a scrub brush or sponge to clean both the outside and inside of the grill. Be sure to let your dry all surfaces before using it next.

4. Give your lawnmower a tune-up

Keeping your lawnmower in top shape will help avoid performance issues and help increase reliability. The grassy buildup in your lawnmower can invite rust and clog the discharge chute, leaving clumps on your lawn. Routine cleaning can help ward off future problems, so take time this month to do a checkup. Disconnect the spark plug and remove the blade before dislodging debris with a putty knife and wire brush. Use a hose to spray away any remaining clippings.

5. Upgrade old windows and doors. Replace damaged screens.

Windows should shut properly to maintain temperature control. Check the caulking or sealant around indoor and outdoor windows and replace if necessary. Also check for water stains on with windowsills as well.

6. Schedule a cleaning for your HVAC system

Reaching out to your HVAC contractor now could help increase air conditioning efficiency and nip any heating issues before it gets too cold outside. Ensure that the fan is functioning well, the coils are clean, there isn’t faulty wiring that could cause a fire and pay particular attention to the noises the appliance is making. If it doesn’t sound correct – it probably isn’t! Don’t forget to change your filter. Here is a great website digging a little deeper into HVAC maintenance.

7. Power wash the outside of your home.

The Tennessee heat and humidity can cause mold and mildew to grow faster on your home’s exterior, particularly if you have vinyl siding. Use a power washer with a mildew remover compatible with your siding.

8. Prune your flowers, bushes, and trees. Add new additions to your garden.

If you were unable to get to your home’s garden during the spring, it’s not too late! The summer is a fantastic time to work on your green thumb, to beautify the appearance of your home. Consider adding mulch to the garden beds, which create a clean appearance. Mulch reduces weeds and locks in moisture, keeping plants healthier during the hot temps. Also, prune flowers, bushes, and trees, so they’re away from your home’s exterior, roof, and central AC unit.

9. Check your home’s insulation.

This is particularly important for homes more than 15 years old. You can find insulation issues pretty much anywhere throughout your house, from the front door to the attic, to cracks in your garage door (especially if the garage is attached). With higher cooling costs in the summer, now is time to seal any insulation gaps you may encounter. Adding insulation is a great low-cost method of lowering your heating and A/C bills.

10. Inspect your attic and crawlspace

Check both the crawlspace and attic for evidence of pests, insects, water damage, mold, or mildew. Turn off the lights to check for any sign of peeking daylight. Sunlight visible through gaps in flashing could allow insects or water intrusion. Crawlspaces are particularly prone to humidity-related issues as well.

Be an all-season homeowner with these useful tips. Maintaining your home during the heat of summer is just as crucial as other seasons. If you would like a professional inspection of your home to help guide you in maintaining your home, please book an inspection today!

Thomas Recke, ACI

ASHI Certified Inspector

Owner of 3 Arrows Property Inspection